

details
4 servings
5 minutes
20mins – 1.5hr
Easy
Urdi dhal Fiji style or as it’s more commonly known, ‘black’ dhal is a very flavoursome dish. It is in it’s own league when it comes to the different varieties of dhals that Fiji Indians eat. There is the yellow dhal – the more common type and you can get the recipe here. Then there is a huge variety of different types of lentils with different combinations mixed together that are made by varying households.
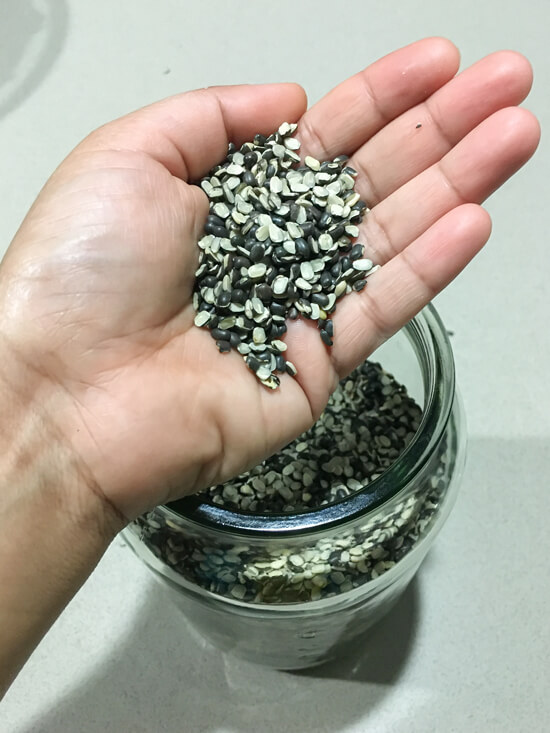
This dhal is also known as black gram or urad lentil. The skinned variety is whitish in colour but the split urad or split urdi dhal with skin on is the one we want for this dish.
It isn’t the most cooked variety in most homes. It always surprised me when young people did not know what this type of dhal was. I suppose the decline in popularity could be somewhat attributed to the rising price of ghee. Now ghee is the essential ingredient in this dhal and without ghee, this dish will not be ‘quite right’. Using other types of oil will not yield the authentic flavour that is attributed to urdi dhal. Living overseas, we have come to appreciate the food of our family and our country even more. Cooking traditional foods such as urdi dhal regularly has kept our bodies healthy and us connected to our homeland. Food has such a powerful impact on our memories as the sight and smell reminds us of our parents and grandparents preparing it for us and sharing with us the knowledge and health benefits of each food we ate. Looking back, I hardly remember liking this dhal as a young person, opting to eat junk food and meat dishes where possible. However, with life experiences we seem to gain more awareness of what is good for us and what isn’t.
My grandpa loved to cook on his outdoor stove or chula and more often than not he would be seen making this dhal. It would take hours to boil but he would take his time to make sure the lentils had cooked before adding the ‘tadka’ (roasted onions and garlic in ghee). This was a time before pressure cookers had taken over most kitchens in Fiji and if dhal was to be made for lunch, it would need to be on the wood fired stove and cooking by 10 am. Pressure cookers are such time savers though. It only takes 20 minutes in a pressure cooker while it takes up to an hour and a half on the stove! Don’t worry if you don’t have a pressure cooker, you can always use a household stove to get the job done. The instructions for both methods are included in the directions below.
Ingredients
¾ Cup Split Urdi Lentils (Skin On)
2 Tbsp Ghee
1 Medium Onion, Diced
1 Sprig Curry Leaves
½ Tsp Cumin Seeds (Jeera)
½ Tsp Mustard Seeds (Sarso)
¼ Tsp Fenugreek Seeds (Methi)
¼ Tsp Asafoetida (Hing) – Optional
1 Small Habanero Chilli (Bongo)
3 Cloves (Large) Garlic, Crushed
1 Inch Piece Ginger, Crushed
Salt – to taste
Directions
- In a pressure cooker or pot, wash and add the lentils with 4 cups of water, ¼ of the diced onion, chilli and salt to taste. If using a pot on a stove, boil for an hour or till the lentils become soft and have ‘melted’. In a pressure cooker, cook for 20-25 minutes on medium heat (lower heat if there is excessive whistling)
- Once dhal is ready, in a separate pot, heat ghee then add curry leaves and cumin, mustard, asafoetida and fenugreek seeds. Cook till they crackle and pop and release an aroma
- Add in the remaining onions and cook till it begins to brown
- Place the garlic and ginger and cook till it browns
- Gently add a soup ladle full of boiled urdi dhal (½ cup) into the pot with the ‘tadka’ (fried onions and garlic) and immediately cover to prevent the escape of any steam
- Add the remaining boiled dhal to the pot and stir through
- If the consistency is too watery, cook on the stove for 5-10 minutes to let excess water evaporate. If it is too thick, add water in increments of a cup till desired consistency is achieved and simmer for 5 minutes before serving
- Serve with rice or roti and fresh salad or chutney.
